Pages

7.18.2012

Please Pass Along...

Our dear friends, Emily and Richard, are in the process of trying to adopt!  They are wonderful friends and neighbors, and I know they will be even better parents!  They have helped us so much with Frosty and Thomas in the time we have known them, and now I'd like to make a little shout out to possibly help them.

If you know anyone who is considering adoption or looking for adoptive parents, PLEASE pass this blog onto them...


You can check out Emily and Richard's full story at their adoption blog... http://richardemilyadoption.blogspot.com/

I know I don't have a lot of followers... but if you happened here for any reason and know someone to pass this on to, please do it!  :)


7.17.2012

Funny Church Signs

Ok... I am not going to lie... I think the "witty" phrases that churches put on their signs are HILARIOUS!  Like, seriously, REALLY, REALLY FUNNY!

I have thought this for awhile and while driving, I like to point them out to Todd and laugh.

Well, last weekend, Todd spotted this one, and I just couldn't help taking a picutre.  The best part is, I saw almost the exact same one yesterday at another church!  So apparently, this one wasn't as creative as I thought... but still really funny!


Weekend Recap

This weekend we went to Roanoke to attend the wedding of our friends Tripp and Marianne.  Since my family also lives in Roanoke, we decided to make it a long weekend.  We left on Thursday and came back home on Sunday.  Here is a recap of the fun we had!

On Thursday, Todd went golfing with my dad while I went to Vinton to see my friends Crystal and Paula.  We all graduated from Tech together and are now all elementary teachers and mommies to boys!  Crystal had her son, Jaxon (3 months) and Paula had her son, Ethan (15 months).  It was so fun to watch the boys play and interact some, but unfortunately I didn't get any pictures!

On Friday, Thomas, my mom, my sister, her two boys, my other sister's two kids and I all dressed like cows and ventured out to Chick-Fil-A for free meals!  We had a whole HERD of cows with us and it was quite an experience!


After Chick-Fil-A we also got to spend some time hanging out with my sisters and their kids.

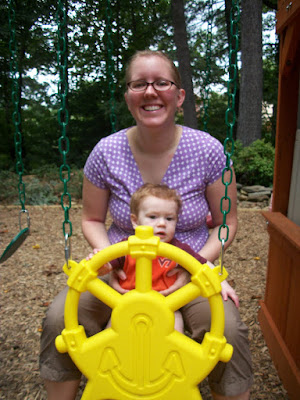
On Saturday, before the wedding, we enjoyed some time outside in my parents' back yard.  They have quite the playground structure out there, and Thomas enjoyed trying out some of it!  Frosty also really enjoyed roaming around the wooded areas in the backyard, too.


We were even able to get a few family photos... which can be hard.  But these ones turned out pretty good... if only Thomas was as interested in the camera as he is in Frosty!


Frosty was off to the side... that explains Thomas's glance.

We moved Frosty so that she was laying where the camera was...
only she was on the ground, and the camera wasn't!

Then, on Saturday night, we went to Tripp and Marianne's gorgeous wedding!  The ceremony and the reception were both beautiful and the food at the reception was INCREDIBLE!  It also gave us a good opportunity to catch up with some friends who we haven't seen in awhile.


This is the ONLY picture I got of Tripp and Marianne...
and it's not even a good one!

And that was our trip!  On Sunday morning, we packed up and headed home.  All in all, we had a really great time and loved being able to spend time with family and friends!

Make it Monday #4: Oreo Chocolate Chip Cookies

Time to link up with Ashley over at


The Polluck Potluck

for another addition of Make it Monday!

Today, I am sharing the BEST cookie recipe I have ever made!  Seriously.  MUST. TRY.  ASAP.

I originally made these cookies for our June dessert party.  The theme was "Desserts you can eat with your fingers" so a cookie seemed logical.

I found the original recipe through this pin.


Here is the recipe with the changes I made and some pictures to go with the directions:

Ingredients:
1 cup butter, room temperature
3/4 cup brown sugar
1/4 cup white sugar
1 (4.2 ounce) package instant Oreo Pudding mix
2 1/4 cups flour
1 teaspoon baking soda
2 eggs
1 teaspoon vanilla
1/4 teaspoon salt
2 Hershey's Cookies N Cream Candy Bars broken into small pieces (I used 2.6 ounce King Sized bars) **I used 3 normal sixe candy bars and broke them up before taking them out of the package.**
2 cups semi-sweet chocolate chipsn **I only used about 1 cup.  With 2 cups these cookies were a bit too rich for me.**

Instructions:
Preheat oven to 350 degrees.

Combine flour, baking soda, and salt in a small bowl and set aside. Cream together butter and sugars. Beat in pudding mix until blended. Add the eggs and vanilla and mix well. Add the flour mixture and mix to combine. Stir in cookies n' cream pieces and chocolate chips. Batter will be thick.  **I didn't really find the dough to be thick, personally.**


Using a cookie dough scooper, place golf ball sized dough balls on a baking sheet lined with parchment paper. Bake at 350 degrees for 8 minutes. You do not want to overbake these! Let cookies cool for 5 minutes on baking sheet before moving to a cooking rack. Store in air-tight container. Makes two dozen.  **I did use a scooper... but I got more like 4 dozen cookies!**


As I said before, these are the BEST cookies EVER!  Everyone who has tried them has said how good they are!  You need to go bake the right now.  Seriously... GO! :) 

Oh... and by the way... here are some additional steps you should follow in this recipe if you are a mommy or a wife...

1.  Entertain your baby with the measuring cups.  Of course, only AFTER they have been used and rinsed, so as to not contaminate these delicious cookies with baby drool! :)


2.  Bribe your husband with the extra cookies and creme chocolate bar you bought to do the dishes for you! :)


7.04.2012

4th of July

Happy Independence Day!!!

In January, Todd and I created a calendar for his mom and my mom with pictures of Thomas wearing a different outfit for each month.  We had to pull from clothes that were too big for him for some of the pictures, but we were able to find something unique that fit each month.

This is the picture that was put into the calendar for July.  This was taken when Thomas was about 2 months old.  The outfit he was wearing was a 6-9 month outfit.


Fast forward 6 months, Thomas is almost 8 months now (can you believe it??) and actually wearing 6-9 month clothes.  So, what is he wearing today in honor of the 4th of July???  This exact same outfit!!!  I couldn't resist snapping some pictures to compare his little 2-month self to his now much bigger 8-month self.


Seeing these pictures side-by-side like this make me realize how much he really has grown up.  In the pictures from today he is really engaged and intrested in that flag!  And he sure fills out the outfit a bit better now...

I wish I had thought to do these comparison pictures throughout the year... but today was the first day where he was literally wearing the same outfit... so it kinda just struck me today!  But... I was able to find a few comparisons from earlier months.  ENJOY!

For each month, the first picture was the picture in the calendar.  These were taken when he was 2 months old.

March:
On St. Patrick's Day - 4 months old


April:
On Easter - almost 5 months old


May:
On Mother's Day - just about 6 months old


 June:
On Father's Day - 7 months old


7.03.2012

Make it Monday #3: Baby Food

How I make baby food:

1.  Cut desired food into chunks.  If using frozen food, not need to cut.  This particular picture is pears.

2.  Cook your food, if needed.  Personally, I use my Pampered Chef Mircrowave Steamer because it is A LOT easier that doing it on the stove.  I simply add some water and microwave for 4-6 minutes depending on the hardness of the food.   Some foods, like bananas or avacados, don't need to be cooked first.


3.  I had read online, that when you are trying to make peas into baby food, it's best to soak them in cold water right after you cook them.  For some reason, this helps the shells be easier to puree.  Don't ask me why... but I found that doing this to any food helps just because the food isn't boiling lava hot after a good soak in some cold water!  So, after I drain my food, I pour it into a bowl of cold water.  For this picture, you will see peaches.  I was really bad at remembering to take pictures of each step, so that is why it's not all the same food!


4.  Put your food into a BLENDER and use the puree setting.  Blend for a few seconds until you don't see anymore large chunks.  Now, I say blender with enthusiasm, because I have tried using my food processor, and it DOES NOT work as well.  The puree setting on my blender works FANTASTICALLY!  For some foods, like carrots or peas, you can add a little water to help with the consistancy.  I usually use cold water, but sometimes I save the water I cooked the food in.  However, for some reason you are NOT supposed to do this with carrots... dunno why... something about nitrates... so use new water when making carrot puree. 

Now, of course, I forgot to get a picture of my blender... but I think you get the idea anyway!

5.  Pour the pureed food into ice cube trays.  I had read this idea online and a recent new-mommy friend of mine also suggested it, so I went with it!  This makes it very easy for storing and defrosting.  This particular picture shows some cubes of zucchini and some cubes of a peas/carrots mixture.


6.  Wrap your ice cube trays in plastic wrap and put them in the freezer.  Once they are frozen, transfer the cubes into freezer bags.  I keep a freezer bag for each type of food. 

7.  When you are ready to serve the food, simply pull out a couple of cubes and defrost them in the microwave.  Each cube is about one ounce of food, and Thomas usually eats 3-4 cubes per meal. 


What I really love about making my own food is that it gives us the chance to feed Thomas different foods in each meal without having to open many containers of baby food.  I like to make LOTS of food in one day, then I don't have to worry about it later in the week.  I just have to pull out some cubes and defrost! 

I also like that sometimes I can make the food a little less "smooth" so that he gets used to different textures in his food.  He likes to get a bit of soft peach and "chew" it a little! 

I have used a variety of frozen and fresh fruits and veggies, and each one has been pretty easy... even the peas!  I will say the peas were nearly IMPOSSIBLE in the food processor, but in the blender, no problem... they purreed easily.

So far, I have cooked, purreed and frozen these foods:
Carrots
Peas and Carrots
Sweet Potatoes
Pears
Peaches
Zucchini

I am planning on trying squash, broccoli and green beans soon...

Happy (almost) Fourth of July and THANK YOU to all the men and women who have served and are currently serving our country in the armed forces!

6.28.2012

Make it Monday #2: Mexican Style

Again this week, I am linking up with Ashley over at


The Polluck Potluck

for MAKE IT MONDAY!
A bit late, I know!


Tonight for dinner I used some more of my Pinterest pins to plan a menu.  As inspiration (or should I say pinsperation), I used these pins:

Taco Pie
Source: manteresting.com via Erica on Pinterest


Mexican Rice 
(Like you get at a Mexican restaurant)
Source: food-pusher.blogspot.com via Erica on Pinterest

Now, when I say inspiration I really mean it, because I didn't follow exact recipes, I simply used them to create my own thing.  Now the first pin (for taco pie) didn't link to a recipe, so I did google it go figure out what was in it.  Basically it was, pie crust, taco beef, cheese, lettuce and tomato.  I changed it up a little.


I used a frozen pie shell and then layered it with refried beans.
Then I put in a layer of cooked beef seasoned with taco seasoning
and then sharp cheddar cheese.
I baked that @ 350 for 15 minutes.  
In hindsight, I realize I should have baked it a little more... 
the crust was a bit mushy.
Next, I added a layer of lettuce, tomatoes and crushed tortilla chips.
I served this Taco Pie with a side of peppers stuffed with the rice.
I didn't follow the rice recipe... 
I simply added a cup of salsa and
some taco seasoning to the already cooked rice.
I did microwave the peppers for about 4 minutes before stuffing them.
I baked them at the same time as the pie... 

maybe why the crust wasn't quite done.
I finished the pie off with a dollop of sour cream...
And like any good pie, it completely fell apart upon serving!
Notice how this meal was NOT fancy enough to serve on real plates :)

Overall, it was a great meal!  You should try it yourself...
put those pins to use! :)

ENJOY!